Line Drawing
When we first picked up a pen or pencil and started making marks on paper, we began with line. Whether self-taught, through trial and error, or guided by others, we learned how line defines form, creates structure, divides a frame, traces contour, creates tonal variation (cross-hatching, for example) and leads the eye from one part of a work to another. Initially a mechanism for getting outlines onto paper – identifying edges – we begin to applaud lines for their own merit: celebrate their presence…whether a jet flick of charcoal on paper or a streak of graphite.
This article contains exercises for Art students who wish to produce contour line drawings, cross contour drawings, blind drawings and other types of line drawings. It is a teaching aid for high school Art students and includes classroom activities, a free downloadable PDF worksheet and inspirational artist drawings.
Blind Contour Drawing
Definition: A blind contour drawing contains lines that are drawn without ever looking at the piece of paper. This forces you to study a scene closely, observing every shape and edge with your eyes, as your hand mimics these on paper. The aim is not to produce a realistic artwork, but rather to strengthen the connection between eyes, hand and brain: a reminder that, when drawing, you must first learn to see.
Blind Drawing Exercises: Blind drawing is an excellent way to start a high school Fine Art programme. Drawing wobbly lines that bear little resemblance to the chosen object is relaxing and stress-free. Often, a classroom bubbles with laughter at the unexpected results. Blind drawing stretches the arms and soul; eases you into observational drawing without fear.
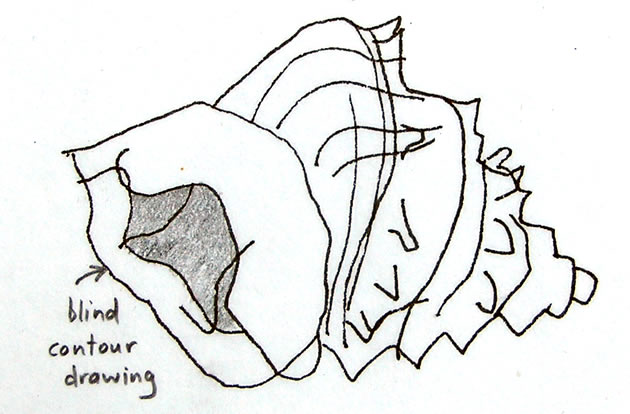 A warm-up activity in which students were asked to create blind contour line drawings of shell (teaching exemplar by the Student Art Guide). These blind drawings were included in the first preparatory sheets submitted by CIE IGCSE Art and Design students.
Gesture Drawing / Timed Drawing / Movement Drawing
Definition: A gesture drawing is completed quickly – often in short timed durations, such as 20, 30, 60 or 90 seconds – using fast, expressive lines. Gesture drawings capture basic forms and proportions – the emotion and essence of a subject – without focusing on detail. Due to their rapid completion, they are a great way to record movement and action, as well as increase your drawing speed, confidence and intuitive mark-making skill. Gesture drawings are best completed with smooth, easily applied mediums (chunky graphite pencils, charcoal sticks, pastels, soft brushes dipped in Indian ink, for example), without the use of an eraser. They are often completed on large, inexpensive sheets of paper, where you can move your arm fluidly, be bold with mark-making, and not worry about mistakes. As with blind drawings, gesture drawing is an ideal warm-up activity.
Gesture Drawing Exercises: When you begin investigating your subject matter in the initial phase of a high school Art programme, it can be helpful to make several first-hand gestural drawings. The best of these can be selected for your final portfolio (taking advantage of a photocopier or digital camera to reduce in size, if necessary). A small still life scene can be depicted just as easily as a large moving form.
A gesture drawing by Rembrandt Harmenszoon van Rijn:
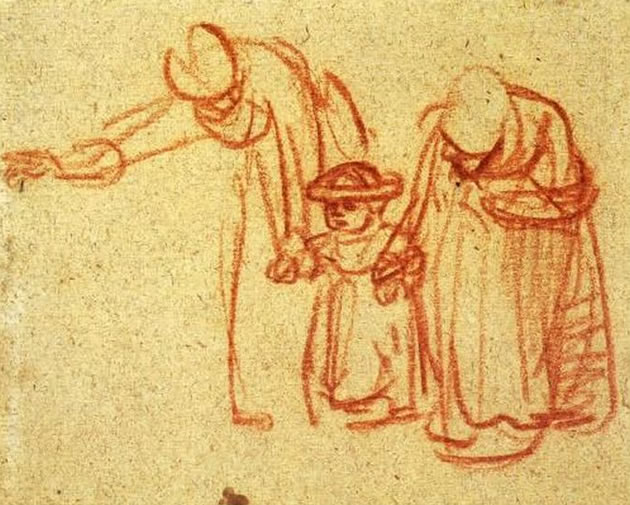 This gestural drawing by Rembrandt is completed using red chalk on rough, textured paper. With just a few expressive lines, we instantly recognise the scene: two women teaching a child to walk.
A gestural figure drawing by Chelsea Stebar:
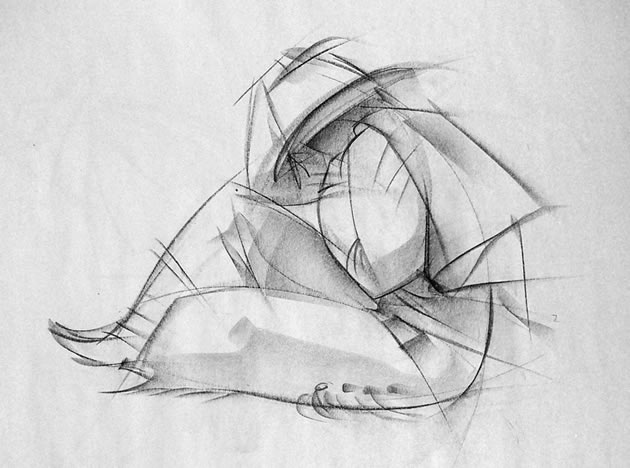 Completed while studying Animation, this gesture drawing captures a clothed figure. Note the variation in line weight: light lines applied initially, with darker lines and hints of detail all that are needed.
Continuous Line Drawing
Definition: A continuous line drawing is produced without ever lifting the drawing instrument from the page. This means that, in addition to outlines and internal shapes, the pencil must move back and forth across the surface of the paper, with lines doubling back on each other, so that the drawing is one free-flowing, unbroken line. To avoid the temptation to erase lines, it can be helpful to complete a continuous line drawing with an ink pen, varying the line weight, as needed, to indicate perspective and areas of light and shadow. Like the drawing methods described above, this drawing method develops confidence and drawing speed, and encourages your eyes and hand and brain to work together. Continuous line drawings work best with in-depth observation of your subject, without interference from your thinking mind. According to Smithsonian Studio Arts:
…continuous line drawing is actually a very powerful way to create a piece that is both hard edged and fluid, representational and abstract, rational and emotional all in one.
Continuous Line Drawing Exercises: This drawing method is great for sketchbooks and drawing from life. It can be an excellent starter activity, with drawings completed on large, inexpensive paper that can be scanned / edited / cropped and used in other ways within your projects.
An A Level Art sketchbook page by Lucy Feng from Hereford Sixth Form College, Herefordshire, UK:
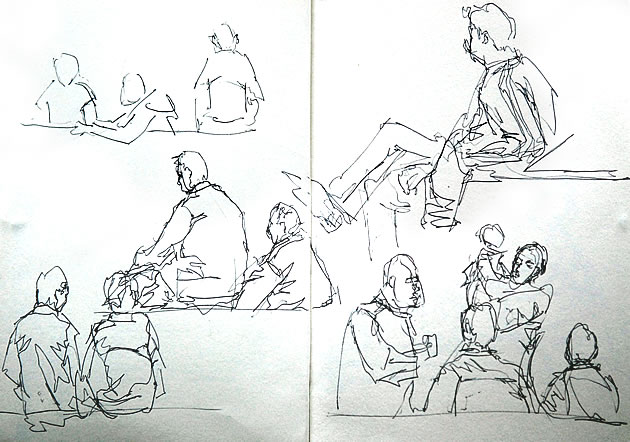 This beautiful sketchbook page contains several continuous line drawings, drawn from first-hand observation.
Contour drawing
Definition: A contour drawing shows the outlines, shapes and edges of a scene, but omits fine detail, surface texture, colour and tone (‘contour’ is French for ‘outline’). According to Wikipedia:
The purpose of contour drawing is to emphasize the mass and volume of the subject rather than the detail; the focus is on the outlined shape of the subject and not the minor details.
The illusion of three-dimensional form, space and distance can be conveyed in a contour drawing through the use of varied line-weight (darker lines in the foreground / paler lines in the distance) and perspective.
Contour Drawing Exercises: Using line alone eliminates the challenge of applying tone, colour and mediums; and instead focuses attention solely upon shape and proportion. After completing warm-up activities such as blind and gesture drawings, slower, more formal contour drawings can be an excellent way to begin more realistic representations of your subject matter. Used intermittently throughout projects, contour drawings can also be helpful for the student who needs to work faster.
A contour drawing by Ultima Thule:
 Modern line drawings by Ultima Thule: there is a slick contrast in this drawing between the sharp black lines and the dripping green. The application of colour to one area creates a dramatic focal point.
Cross contour drawing
Definition: A cross contour drawing contains parallel lines that run across the surface of an object (or radiate from a central point), such as those that appear on a topographical map or a digital wireframe. The lines can run at any appropriate angle (sometimes at multiple angles) and may continue across objects and into the background. Cross contour drawings typically follow the rules of perspective, with lines drawn closer together in the distance and further apart in the foreground. In this type of drawing, the illusion of three-dimensional volume is created entirely with line.
Cross Contour Drawing Exercises: This is an excellent way to gain familiarity with the volumes and three-dimensional forms in your project, producing analytical cross contour drawings that are suitable for sketchbooks or early preparatory sheets.
Cross contour drawing of a shell by Matt Louscher:
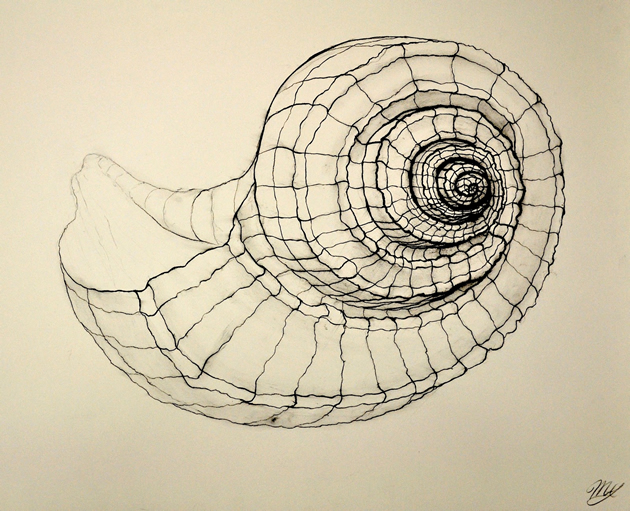 This delicate cross contour drawing helps to communicate the bumpy surface of the shell. Note how the shell pieces that are furthest away from the viewer are thin and light, whereas those that are closest are darker and thicker. Note also how the direction of the contour lines relates to the shape of object that is drawn, with lines projecting outwards from the centre of the shell.
Cross contour hand drawings by (from left) Mathew Young, Ryan Acks and Lea Dallaglio while studying at the San Jose State University, Department of Art and Art History:
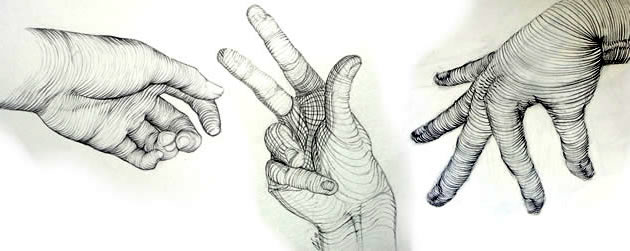 Hands are a great subject for a cross contour line drawing exercise. Hands can create interesting, complex, curving shapes, as in the examples above, and are readily available for first-hand observation. Note how the density and weight of the line also helps to communicate areas of light and shadow.
Cross contour drawings by Daniel Servin (left) and Alfred Manzano, completed while studying AP Studio Art at Mt Eden High School in Hayward, California, USA:
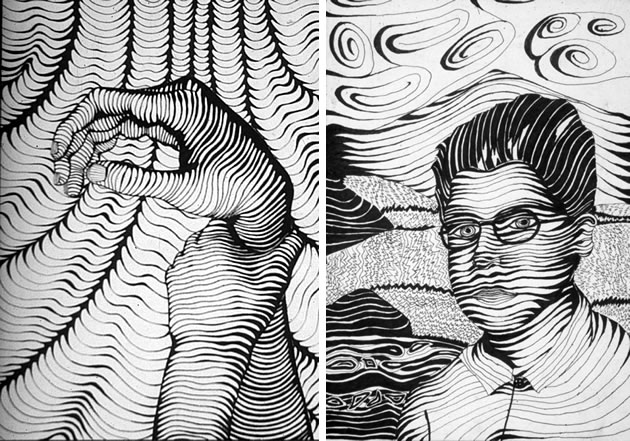 These cross contour drawings were completed as part of Breadth assignments for AP Studio Art. These drawings show clever use of line thickness, with the line-weight varying in order to create the illusion of tone and show three-dimensional form.
A wireframe contour drawing exercise by Year 9 student Seonmin Lee from ACG Parnell College, Auckland, New Zealand:
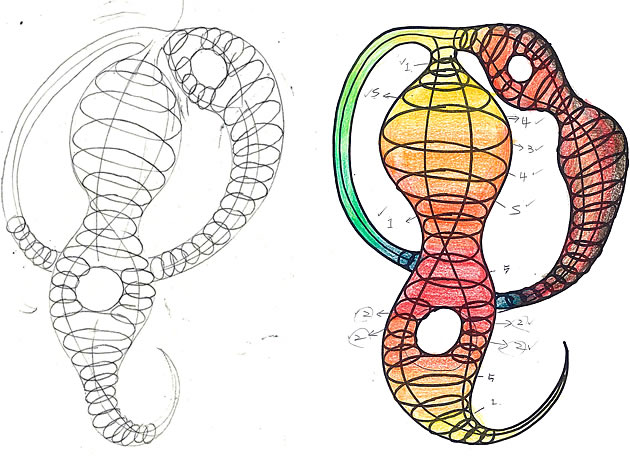 Contour lines can also be a great way for students to design three-dimensional forms. These drawings were completed as part of a papier mache sculpture project, with the contour lines representing the supporting cane structure.
Planar analysis drawing
Definition: A planar analysis drawing simplifies complex curved surfaces into flat planes, using straight lines. This process helps students to think about the underlying structure of objects and results in an analytical drawing, that is rather mechanical in appearance.
Planar Analysis Drawing Activity: This can be a great introductory drawing exercise, especially if you are moving towards Cubism or abstracting scenes into geometric form.
A planar analysis portrait completed by a student of Cat Normoyle:
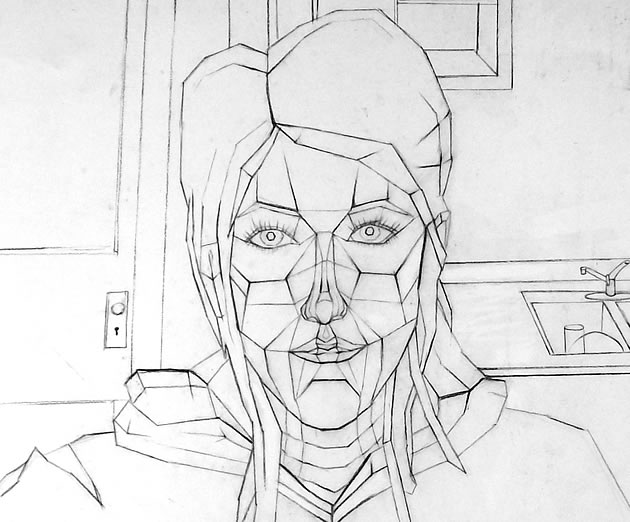 The symmetry and familiarity of the human face makes portraiture a great subject for planar analysis; the task of converting complex three-dimensional form into flat surfaces. Note the careful attention given to the nose and lips in this example.
Wire sculpture drawings
Definition: Wire can be cut and bent into shapes with pliers to create three-dimensional ‘drawings’, often resulting in a work filled with flowing, curved lines. These wire sculptures can be attached to a two-dimensional frame or a flat surface, hung in the air, or be left free-standing, changing in appearance as a viewer moves around the room. Due to their flexible nature, wire sculptures often move slightly in the wind, adding an extra interactive element to the work.
Wire Sculpture Line Drawing Exercise: This is an excellent activity for middle school students and for high school students, if it relates specifically to your project (and does not interfere with postage requirements, for those who need to post work away for assessment). Small wire experiments, using light-weight wire, can also be mounted to sketchbook pages.
Wire sculptures completed by the students of Amy Bonner Oliveri from Allendale Columbia School, Rochester, New York, USA:
 This wire drawing exercise ‘using line to create space’ is completed by students within a 3D Art class, working over photographic portraits. Having a base image to work from (this could also be an earlier observational drawing) makes the process of transferring from two-dimensional to three-dimensional much easier.
Hatching, cross hatching, and other line techniques
As well as representing contours, line can also be used to apply tone (light and shadow) to a drawing. This can be done by altering the:
- Gap between the lines
- Lightness / darkness of the line
- Thickness of the line
There are many line techniques can be used to create tone, as illustrated in the worksheet below. Common techniques include:
- Small dashes
- Hatching (long, parallel lines on an angle)
- Cross-hatching (parallel lines at right angles)
- Stippling (dots)
- Scribbles
- Small crosses
- Small circles
The angle that these techniques are applied may remain constant within a drawing, or it may change in response to the angle and direction of the forms. For example, cross-hatching may flow around the surface of an object in a similar direction as cross contour lines. These techniques are also a great way to create the illusion of texture (see our article about observational drawings).
Line Techniques Worksheet: The worksheet below has been provided by the Student Art Guide for classroom use only and may be issued freely to students (credited to studentartguide.com), as well as shared via the social media buttons at the bottom of this page. It may not be published online or shared or distributed in any other way, as per our terms and conditions. The full size printable worksheet is available by clicking the PDF link below. This worksheet is suitable for middle school students, or senior students who have not had prior experience with line techniques.
 This worksheet introduces a range of line drawing techniques and encourages students to invent their own (such as using the first letter of their name). It allows students to practise using these techniques and to apply tone to a range of simple geometric objects.
Click here to open the full size worksheet as a printable PDF.
An Indian Ink still life drawing by Kirana Intraroon, completed while in Year 10 at ACG Strathallan College, Auckland, New Zealand:
 In this ink drawing, a small grid experimenting with different line techniques has been included in the top left of the work. Some of these have been selected to apply tone to the work, carefully replicating reflection and shadow. This image was completed using a sharpened bamboo stick dipped in black ink.
An A* GCSE Art sketchbook page by Samantha Li:
 In this sketchbook page Samantha imitates and analyses a line drawing by Vincent van Gogh, discussing the suitability and appropriateness of each technique. Note that when learning from artists, it is rarely necessary to slavishly copy an entire work; replicating small pieces (as in this example) is often all that is needed.
A final GCSE Art piece by Hannah Armstrong:
 This enormous pen drawing of a Baryonyx dinosaur measures 1.2 x 2.1 metres, and took over 70 hours to complete. It was the dramatic conclusion to a Year 11 high school Art project.
Artist line drawings
Here is a collection of line drawings from famous and less well known artists, to inspire high school Art students and teachers. This section is continually updated. Enjoy!
 Line drawings by Picasso: a series of drawings showing the progression from realistic form to a few curving lines. Tone and detail have been eliminated: the bull stripped back to its essence.
 Pop artist Andy Warhol is famous for his brightly coloured silkscreen artworks; however he was also a rampant drawer – often filling sketchbooks. He won many prizes for the drawings he produced in high school. The illustrations shown above – comprising of slightly smudged and blotchy black lines – have Warhol’s typical off-beat style. They were completed using a basic printmaking technique: pressing sheets of paper into a wet ink drawing, transferring the image to the second sheet.
 Famous artist David Hockey has produced many line drawings – often portraits. He draws in silence, with precision and care, moving a black ink pen across the paper quickly. This portrait – a snapshot into Hockney’s life – is entitled ‘Eugene and Henry’.
 Most famous for his post-impressionist paintings, Vincent van Gogh also produced over a thousand drawings. In this pen and pencil line drawing, ‘Cottages With a Woman Working in the Foreground’, we see the stylistic swirling of line in the trees and clouds that is so characteristic of his well-known paintings. Capturing the swirling of the trees and the movement of the clouds, van Gogh represents the light falling across the textured landscape with quick, confident mark-making.
 These precise anatomical line drawings by famous artist Leonardo da Vinci show the internal structure of a human scalp, skull and eye. Facial proportions are carefully mapped out and documented in the image to the right; the drawings surrounded by annotation and enlarged details.
 Cross-contour line drawings by Aaron Earley: graphite lines of various weights trace over the contours of the face, clearly conveying emotion, despite the lack of tone and detail.
 Contemporary line drawings by Peter Root: a series of straight graphite lines is used to create a curvaceous, flowing abstract form.
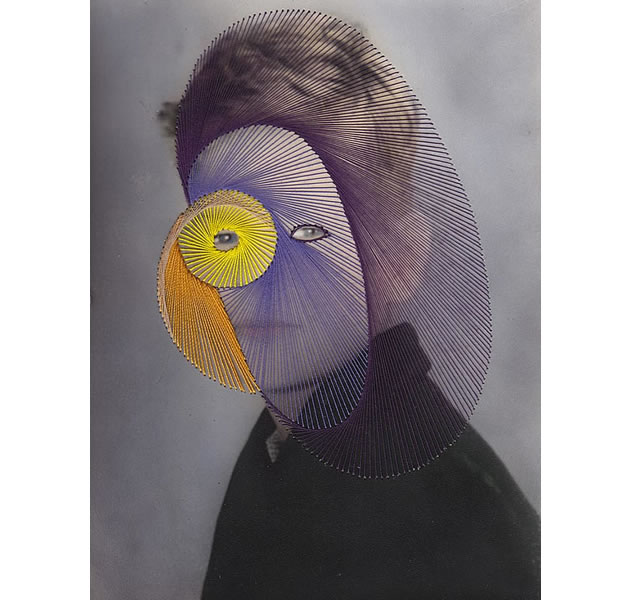
 Contemporary line drawings by Maurizio Anzeri: a portrait overlaid by a mass of radial lines: veiling the image within.
Tornwing:
 Cross contour line drawings by Tornwing: black lines of different thicknesses flow around three-dimensional forms. The strong contrast in this drawing creates a striking graphic image.
 Gestural line drawings by Karolina Cummings: dramatic and vivid, capturing form in rapidly scrawled, fluid line.
 Scribbled line drawings by Daniel Mathers: an explosion of insanity with a black pen.
 Sensitive line drawings by Roz McQuillan: the contrast between the rendered siamese cat and the white cat formed (formed from a few light lines) draws you in to this quiet embrace.
 Pencil drawings by Wang Tzu-Ting: an overlapping sequence of drawings, using lines that approximate tonal boundaries, set on a running wash of acrylic. A stunning image.
 Painterly line drawings by Nina Smart: what appears to be an abstract artwork of smudged and messy paint lines is, upon closer inspection, an accurate and well-proportioned horse. This work was created using a large pipette, cling wrap and a pallet knife.
 Expressive line drawings by Andy Mercer: this mixed media drawing contains a mass of lines that create the illusion of a busy city scene – a tangle of architectural form.
 Line drawings by Vital Photography: this image has been pared back to its most basic – lines representing the edges of form. Without any background to speak of, this collection of marks is enough to communicate a message with ease.
 Scribbled line drawings by Doug Bell: a portrait beautifully crafted from a tangle of lines.

